
We got a huge pain relief from using other third party contact form widgets. Soon after it was released, many awesome developers customized it with their CSS abilities and gave it a new fresh look on their blogs and offered the same for other blogger users.
Every other blogger has his/her own choices and many did not like it to appear into sidebar or footer as a gadget but they wanted it to install into a separate page of the blogger like as WordPress.
I have also written a detailed post on it about How to Add Blogger Contact Form to Separate Page on Blogger. You'll find it a complete step by step guide if it is the first time you're using this contact form widget on a separate page of your blog. You'll find all other major questions answered in my previous article regarding blogger contact form not working.
What is a Responsive Contact Form For Blogger?
Well, in my previous article about it, I had customized this form but it was not a pro version at all. But when I looked into my posts area then I got to know that this is one of the most visited articles on my blog.Then I thought to re-design it from scratch again and make it Professional Looking contact form widget.
All in all, I am happy with the final design and before making it a final copy, I asked my best buddies for their Feedback on its design from time to time. I changed it accordingly many times until they marked it a Professional looking.
I have also written about how to add a contact for to Wordpress Blog, in case you are using Wordpress CSM and I have also released the CSS to customize contact form for Wordpress.
I have completed design the contact form with some professional features and I can say that how to use blogger as a website such as below;
Features of Blogger contact form widget design:
- Fully Responsive Design
- Designed with pure CSS
- Font Awesome integration
- CSS Controlling the form
- Design for Responsive need
- Not much color display.
- Every Email will send directly to Your email address that registers with blogger.com
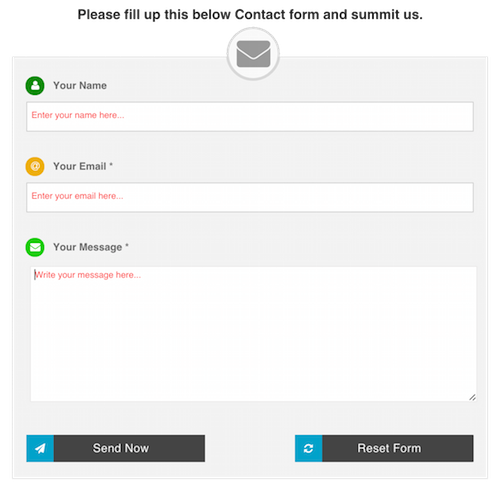
Now Let's start to install this contact form to your contact us page.
Step 1: You need to login to Blogger.com
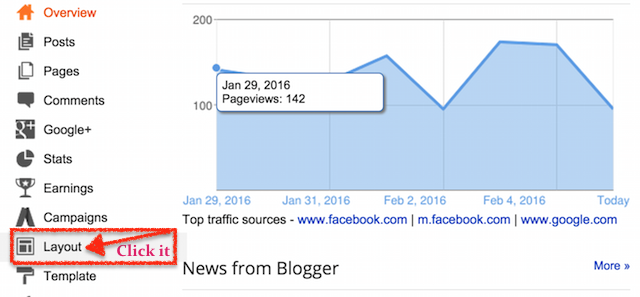
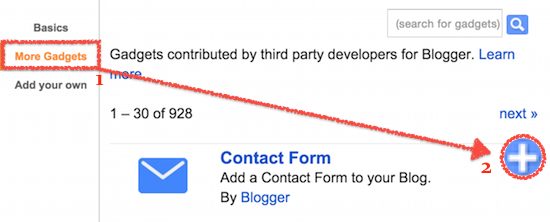
Step 2: Click on "Layout" menu and then click on "Add a Gadget" More Gadgets" then click [+] to add a contact form to your blog sidebar.
Step 3: On the dashboard click on "Template" menu and click "Edit HTML" button.
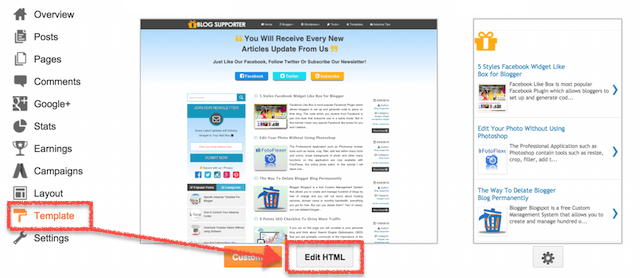
Step 4: Click one in the HTML Code area then press Ctrl + F or Command + F for Mac to search for <head> tag and then copy below code and paste below it then click "Save Template" button.
<link rel="stylesheet" href="https://maxcdn.bootstrapcdn.com/font-awesome/4.5.0/css/font-awesome.min.css">
Note: if you cannot save then code you need to convert it to text in advance. To convert it please use this HTML Converter tool.
Step 5: Press Ctrl + F or Command + F for Mac again and search for </b:skin> tag then copy below CSS code and paste it.
/*--- Contact Form -----------------*/
#message-bg {
background: #fffeef;
color: #585858;
padding: 10px;
text-align: center;
border: 1px solid #F3F3F3;
}
div#blog-supporter_contct_form {
padding: 0px 0px 0 0px;
border-radius: 0px;
color: #1D1D1D;
font-size: 15px;
font-weight: bold;
background:none;
font-family: sans-serif;
}
div#blog-supporter_contct_form .wrap-me {
margin: 0 auto;
display: block;
padding: 30px 20px;
background: #f3f3f3;
border-radius: 0px;
max-width: 700px;
width: 100% !important;
border-top: 2px solid #d8d8d8;
border-left: 1px solid #d8d8d8;
border-right: 1px solid #d8d8d8;
border-bottom: 1px solid #d8d8d8;
box-sizing: border-box;
}
div#blog-supporter_contct_form .wrap-me:before {
content:'\f0e0';
position: absolute;
font-family: FontAwesome;
font-weight: blod;
margin-top: -75px;
margin-left: -35px;
left: 50%;
display: inline-block;
font-size: 48px;
width: 80px;
height: 80px;
background: #f9f9f9;
border-radius: 50px;
text-align: center;
color: #999;
box-sizing: border-box;
border: 5px solid #d8d8d8;
line-height: 70px;
}
input#ContactForm1_contact-form-name, #ContactForm1_contact-form-email, #ContactForm1_contact-form-email:hover, #ContactForm1_contact-form-email:active {
padding: 6px;
margin-top: 6px !important;
box-shadow: 0 0 5px rgba(241, 241, 241, 0.7) !important;
max-width: 100%;
height: 45px;
width: 100%;
border: 1px solid #D2D2D2;
border-radius: 0px;
line-height: 1em;
min-height: 31px;
background: #fff;
font-family: sans-serif;
margin-bottom: 15px;
}
.contact-form-email-message, .contact-form-email-message:active, .contact-form-email-message:hover {
padding: 6px;
margin-top: 6px !important;
box-shadow: 0 0 5px rgba(241, 241, 241, 0.7) !important;
max-width: 100%;
height: 200px;
width: 100%;
border: 1px solid #D2D2D2;
border-radius: 0px;
color: #1d1d1d;
line-height: 1em;
min-height: 80px;
background: #fff;
font-family: sans-serif;
margin-bottom: 10px;
}
/*------[Focus]-------------------*/
#ContactForm1_contact-form-name:focus, #ContactForm1_contact-form-email:focus, #ContactForm1_contact-form-email-message:focus {
outline: none;
background: #FFFFFF !important;
color: #444;
border-color: rgb(236, 235, 235) !important;
box-shadow: 0 0 5px rgba(241, 241, 241, 0.7) !important;
transition: all 0.3s ease-in-out !important;
margin-left: 5px;
}
/*----[Submit button style]-------------*/
.contact-form-button-submit:hover {
color: #FFFFFF;
background: #777 !important;
}
.contact-form-button-submit {
background: #444;
display: table;
font-size: 17px;
margin: 0 !important;
border-radius: 0px !important;
max-width: 100%;
width: 100%;
min-width: 100%;
height: 40px;
float: center;
letter-spacing: 0.5px;
font-family: sans-serif;
font-weight: normal;
cursor: pointer;
outline: none!important;
color: #FFFFFF;
border: 0px solid #fff !important;
text-align: center;
padding: 0px 0px 0px 15px;
text-transform: capitalize;
transition: all 300ms ease-in-out;
-webkit-transition: all 300ms ease-in-out;
-moz-transition: all 300ms ease-in-out;
}
/*----[Submit button on Focus]------------------*/
.contact-form-button-submit:focus, .contact-form-button-submit.focus {
border-color: #FFFFFF;
box-shadow: none !important;
}
/*---[Error message]---------------------*/
.contact-form-error-message-with-border .contact-form-success-message {
background: #f9edbe;
border: 0px solid #f0c36d;
bottom: 0;
box-shadow: 0 2px 4px rgba(0,0,0,.2);
color: #666;
font-size: 12px;
font-weight: bold;
padding-bottom: 10px;
line-height: 19px;
margin-left: 0;
opacity: 1;
position: static;
text-align: center;
}
/*---[Submit Button On Success Message]---------*/
.contact-form-button-submit.disabled, .contact-form-button-submit.disabled:hover, .contact-form-button-submit.disabled:active {
opacity: 0.9;
}
/*----[Success Message]---------*/
.contact-form-error-message-with-border {
background: #000000;
border: 1px solid #08e5ff;
border-radius: 0px !important;
bottom: 0;
box-shadow: none;
color: #FDFDFD;
font-size: 20px;
font-weight: normal;
line-height: 35px;
margin-left: 0;
opacity: 1;
position: static;
text-align: center;
height: 35px;
margin-top: 45px;
}
.contact-form-cross {
height: 14px;
margin: 5px;
vertical-align: -8.5%;
float: right;
width: 14px;
border-radius: 50px;
border: 0 !important;
cursor: pointer;
}
.contact-form-success-message-with-border {
font-weight: normal;
background-color: #419a00;
border: 1px solid #08e5ff;
color: #FFF;
line-height: 35px;
margin-left: 0;
font-size: 20px;
opacity: 1;
position: static;
text-align: center;
height: 35px;
margin-top: 45px;
}
/* Extra Stuff */
div#blog-supporter_contct_form span.name-bg {
background-color: none; #f5fce5;
}
div#blog-supporter_contct_form span.email-bg {
background-color: none; #edfaf2;
}
div#blog-supporter_contct_form span.name-bg, div#blog-supporter_contct_form span.email-bg {
display: inline-block;
max-width: 550px;
line-height: 21px;
width: 100%;
color: #696969;
padding: 3px 5px;
margin: 0px 0px 0px;
box-sizing: border-box;
height: 30px;
border: 0px solid #E4E0E0;
padding-left: 39px;
}
div#blog-supporter_contct_form span.name-bg:before {
content: '\f007';
background-color: #0f8a02;
}
div#blog-supporter_contct_form span.email-bg:before {
content: '\f1fa ';
background-color: #eeae00;
}
div#blog-supporter_contct_form span.name-bg:before, div#blog-supporter_contct_form span.email-bg:before, div#blog-supporter_contct_form span.message-bg:before {
font-family: FontAwesome;
text-align: center;
margin: -4px 0 0px 0px;
font-weight: normal;
padding: 0;
line-height: 27px;
width: 28px;
height: 28px;
display: table;
position: absolute;
margin-left: -40px !important;
border: 0px solid rgba(0, 0, 0, 0.1);
border-radius: 100px;
border-right: 0 !important;
color: #FFFFFF;
}
div#blog-supporter_contct_form span.message-bg {
background-color: none; #EBFFE8;
display: inline-block;
max-width: 550px;
height: 30px;
line-height: 21px;
width: 100%;
border: 0px solid #E4E0E0;
color: #696969;
padding: 3px 5px;
box-sizing: border-box;
padding-left: 39px;
margin: 0px 0px 4px;
}
div#blog-supporter_contct_form span.message-bg:before {
content: '\f0e0';
background-color: #20CC00;
}
div#blog-supporter_contct_form span.send-bg {
display: inline-block;
background: #f8fff7;
float: left;
max-width: 40%;
height: 40px;
width: 100%;
margin-top: 15px;
transition: all 0.4s ease-in-out !important;
}
div#blog-supporter_contct_form span.send-bg::before {
content: '\f1d8';
height: 40px;
}
div#blog-supporter_contct_form span.send-bg::before, div#blog-supporter_contct_form span.clear-bg:before {
font-family: FontAwesome;
background-color: #00a2ca;
text-align: center;
font-weight: normal;
margin: 0px;
padding: 0px;
line-height:40px;
height: 40px;
width: 40px;
position: absolute;
border: 0px solid #fff;
border-radius: 0px 0px 0px 2px!important;
display: inline-block;
border-right: 0 !important;
color: #FFFFFF;
}
div#blog-supporter_contct_form span.clear-bg {
display: inline-block;
float: right;
margin-top: 15px;
height: 40px;
border-radius: 0px!important;
max-width: 40%;
width: 100%;
}
div#blog-supporter_contct_form span.clear-bg:before {
content: '\f021';
height: 40px;
}
input.contact-form-button.contact-form-button-submit.clear-button:hover {
background-color: #777 !important;
height: 40px;
}
div#blog-supporter_contct_form .clear-button {
color: #FFFFFF;
border: 0px solid #FFF !important;
background-color: #444444;
border-radius: 2px!important;
max-width: 100%;
width: 100%;
min-width: 100%;
float: right;
display: table;
height: 40px;
}
div#ContactForm1 {display: none !important;}
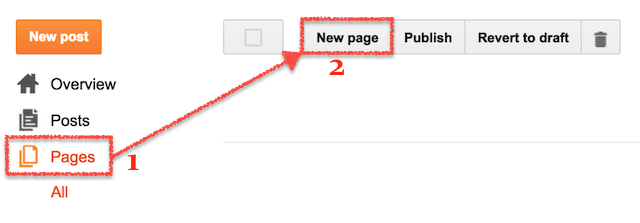
Step 6: Now create a new landing page. One the dashboard click on "Pages" menu and then click on "New page" button. Then it will create a new page and you need to fill up the page title.
Recommended: How to Create a Landing Page on Blogger
Step 7: Now after you create a page click on "HTML" button then copy below HTML Code and paste it in the text field.

<div id="blog-supporter_contct_form">
<div class="wrap-me">
<form name="contact-form">
<div style="float:left;margin-right:4%;font-size:0;font-family:calibri;"><a href="http://www.blogsupporter.com/" target="_blank">Blog Supporter Contact Form</a></div>
<span class="name-bg">Your Name</span><br />
<input class="contact-form-name" id="ContactForm1_contact-form-name" name="name" placeholder="Enter your name here..." size="30" type="text" value="" /><br />
<br />
<span class="email-bg">Your Email <span style="color: grey;"><b>*</b></span></span><br />
<input class="contact-form-email" id="ContactForm1_contact-form-email" name="email" placeholder="Enter your email here..." size="30" type="text" value="" /><br />
<br />
<span class="message-bg">Your Message <span style="color: grey;"><b>*</b></span></span><br />
<textarea class="contact-form-email-message" cols="25" id="ContactForm1_contact-form-email-message" name="email-message" placeholder="Write your message here..." rows="5"></textarea><br />
<br />
<span class="send-bg"><input class="contact-form-button contact-form-button-submit" id="ContactForm1_contact-form-submit" type="button" value="Send Now" /></span>
<span class="clear-bg"><input class="contact-form-button contact-form-button-submit clear-button" type="reset" value="Reset Form" /></span>
<br />
<div style="max-width: 100%; text-align: center; width: 100%;">
<div class="contact-form-error-message" id="ContactForm1_contact-form-error-message">
</div>
<div class="contact-form-success-message" id="ContactForm1_contact-form-success-message">
</div>
</div>
<br/>
</form>
</div>
</div>
Step 8: Now you almost done and just review again fro Step #2 to Step #7 and then click "Publish" button. Then you can enjoy it.
Now just visit your contact us page and see it live yourself. I hope it was super easy to follow tut and I made clear all the things.
Still, if you have some problems then please let me know, I'll help you for sure. I hope you guys liked this new look of blogger contact us form widget in a separate page of your blog.
