
Then if you wish to have a blog and willing to share your love by spreading your articles with the world you should have a blog. I know it is a hard time for a beginner blogger to start a blog without guideline and advisor so in this blog section I will share with you how to be a professional blogger by starting a WordPress blog with HostGator Hosting. Why HostGator? Well, to start a blog you should have a personal web hosting such as HostGator or others. But in this tutorial, I strongly suggest you start with HostGator. HostGator is one of the best hosting providers and innovating new stuff to make it be easy to manage your blog easier, especially WordPress Blog. HostGator is one of the blog hosting providers I suggest to use to host your first website and blog.
Start a WordPress Blog with HostGator Hosting
In this below guide will explain you with these are 7 Steps to start a blog on HostGator. Then let's go through together.Starting a new blog might sound like a big step to go, but actually, everyone can do it.
A hosting company like HostGator set up a new application to make it simple and easy to do it.
The first step in creating a blog to choose a hosting package. What is a web hosting? Web hosting is a space on a web server. Where you can store all your images, videos, text, and website files.
HostGator has three shared hosting plans you can choose one. A shared hosting place is hosting is shared hosting space with other people's space. It has a reasonable price that you can afford it.
These are three hosting package plan you can choose one of them.
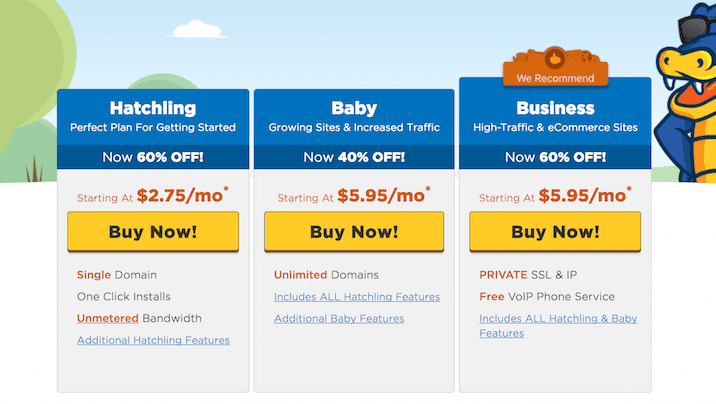
Hatchling Plan is a perfect plan for getting started a blog. This plan allows you to install one blog only but the bandwidth is super, Unmetered using.
Baby Plan is a popular plan for blogger because it allows you to run multiple blogs, but if this is a first blogging experience Hatchling is enough for you.
Business Plan is the biggest hosting. It is a high-traffic and e-commerce site. It is more than a hosting, it offers a private SSL and IP and free VOIP Phone service. It is the best hosting for the big business website.
When you decided to choose once just click "
Sing up now" button to start the first step.Step 1: Register a Domain Name
A domain name is a name of your blog or website and it is how the people can find your blog online by the search engine. You need a good domain name that related to your blog name or blog category and easy for people to remember it. Start to think up a good domain name, I suggest starting with two or three words. Example: foodblog.com but unfortunately this domain name is unavailable.HostGator has a tool to help you to find a domain name you like. Type a domain name in the column below without space then it will automatically show you the availability.
- Register a New Domain: means you need to find a new domain name before you start another step.
- I Already Own this Domain: means you already have one domain then you don't need to register a new one.

At the bottom of this step, you will see the Domain Privacy Protection then if you do not want to protect your domain then I suggest you
UNTICK the box.Domain Privacy Protection means your domain name will online with the HyperText Transfer Protocol Secure (HTTPS). The blog or website the use HTTPS unless their blog sell products online and they want to protect their customers' identity online. Domain Privacy Protection hides the personal contact information or credit card information from public view.
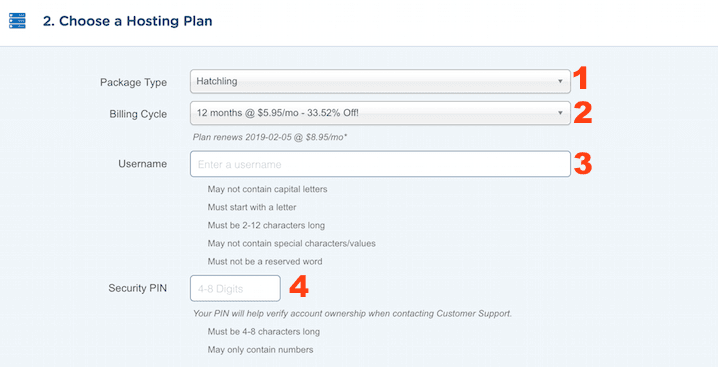
Step 2: Choose a Hosting Plan
- Choose a hosting Plan: one again or you can change the hosting plan from here.
- Select Hosting Period: choose for the period that you want to purchase. It starts from 1 month to 36 months period.
- Username: fill up the username and remember it because you need it to log in your HostGator account when you have done the registration.
- Security PIN: It is very important code that will use to recover the lost such as password, username etc.
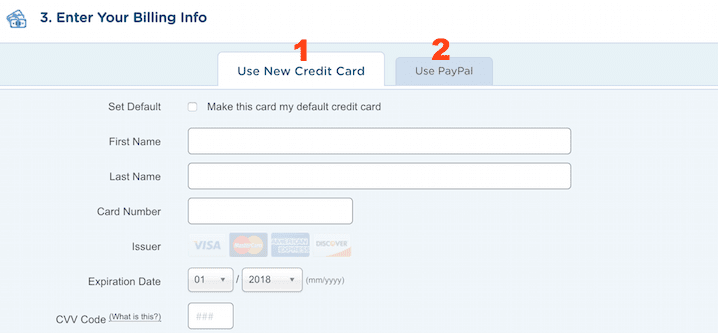
Step 3: Enter Your Billing Information
To complete your purchasing, you need to provide the billing information. In HostGator, there are two options for you to pay for your purchasing.- Use New Credit Card: mean you need to fill up all your personal identification with your credit card information.
- Use PayPal: If you have a PayPal account that connects to your bank or credit card then you can use it to pay for your ordering.
Step 4: Add Additional Services
There are some more additional services when you register a hosting. Those are!- Protect You Site Form Hacker: HackAlert is a monitoring service that checks your website daily and immediately notifies you if your website has been hacked or injected with malicious code.
- Get Your Professional Email: Your emails sync across all your devices. Keep more with 30 GB of storage for email, contacts, and calendar. Powered by Google.
- Backup Your Hard Work: It's insurance for your website. Get daily automated website backup for all web files, databases, and emails with a 1-click restore.
If you need any additional service just
TICK the box or if you do not need them just UNTICK the boxes. That's it!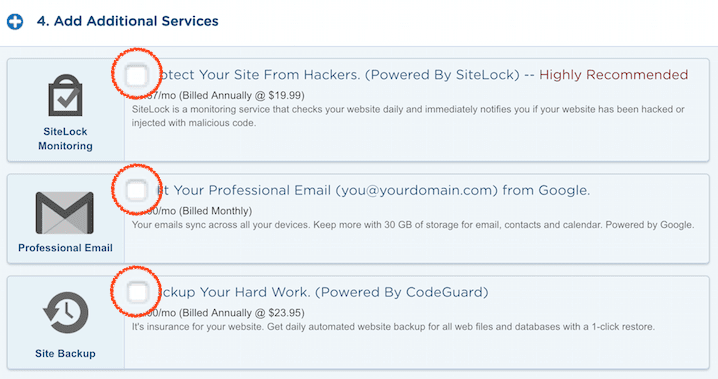
Step 5: Enter a Coupon Code
HostGator released some promotion codes online. You can search for one then you can apply it in this step to get a special discount.
Step 6: Review Order Details
This is the last step and it is a result of the things you have done from the step 1 to step 5. If all things are correct then just TICK the box below before click "Checkout Now!".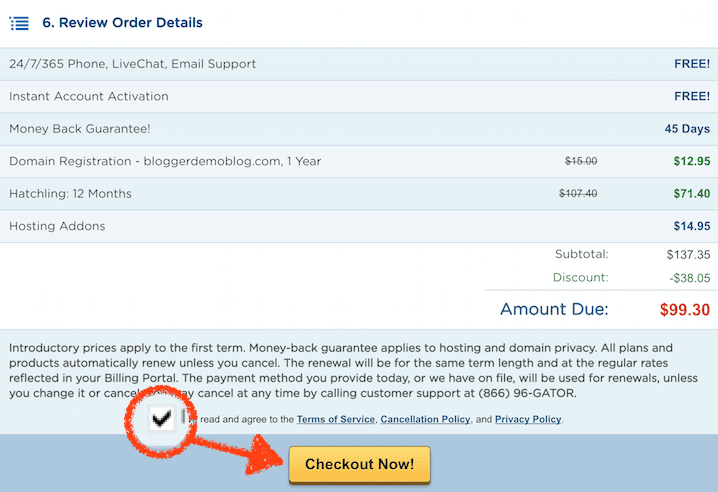
And that is it! you have purchased a hosting from HostGator and the next step you learn how to install WordPress Blog on HostGator. I will release the tutorial soon. Stay bless!
