
blogger that you configure a custom domain with the original domain name from blogspot.com, it is a great free domain name when you create a blogger website via the custom management system which a part of the google application. Most the people like using this free domain name that including the Blogspot name as www.yourname.blogspot.com and especially it has a high Domain Authority. I do not suggest you to use the custom domain name if you do not want to pay money to buy a new custom domain name. But I think you should understand it how to add a custom domain name to blogger to use instead of your free domain name in blogger.com. In this tutorial I will share you how to do it as well as how to configure google DNS which a part that will allow your domain name live on the net.What to know before starting it?
Now, I do not know how long that you have been using your blog if your blog has been hosting about 3 months or more than that, all posting contents of your blog URL (www.youblogname.blogspot.com) have been listing in google search engine. If you configure a new custom domain name, every posting contents of your blog, the search engine will be a starting screw to your new custom domain (www bloggers com) and it will be starting from your new domain name in google search engine optimization. So this is just a blog domain name ideas configuration only.
Now it is a choice that you need to think before you start to do this job. However, it is good if you could using your personal custom domain name.
These below are popular web hosting sites
- EasyDNS
- GoDaddy.com
- ix web hosting
- 1and1
- Yahoo! Small Business
- No-IP
Now let's start to configure specific with Godaddy.
Step 1: Login Blogger Account
Step 2: Go to Setting then click on Basic, then you will get your blogger URL. The below it, there is one link “+ Setup a 3rd party URL for your blog” just click on it.

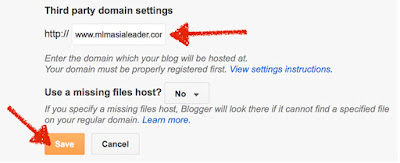
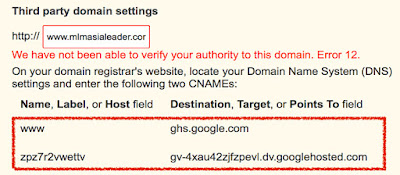
Step 3: Fill up your domain name within www, then click “Save” button to receive the token code. Also, the result is error 12 or sometimes error 32. At the same time, you will receive the token code that allows you to keep for setting up with domain DNS.
Step 4: Go to website Godaddy.com or any website that control your custom domain. Just login it. This below is a Godaddy Control Panel.
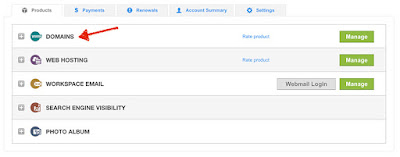
Step 5: After Login You will see a few tab, now just click on "DOMAINS" tab, then find the domain name that you want to configure with blogger, then just click “Manage” Button.
Step 6: Now click on DNS ZONE FILE Tab. Now let's start to add some DNS Record.

Step 7: In "A (Host)" there are a few existing hosting IP that you need to delete them. Tick on these IP then clicks "delete".

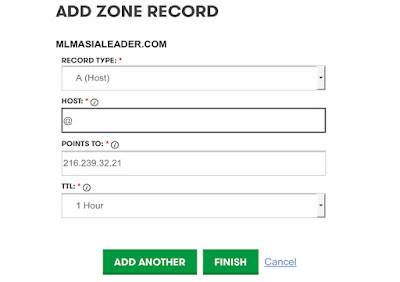
Step 8: Now it is a time that you need to add the google IP inside of "A (Host)".

a. Click on "Add Record" and select "A (Host)"
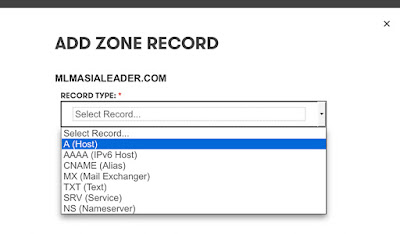
b. Using this below Google IPs to add in the A (Host) Section. These IPs will point to your blog.
Now in the "Host" column add "@" and inside "Point To" column add above Google IPs then click on "Add Another" button to add the another IPs. After you added all 4 IP click on "Finish" button. Then "Save Change "will appear in Red banner then click on it.216.239.32.21216.239.34.21
216.239.36.21
216.239.38.21
Note: in "TTL" just keeping the "1 Hour"

Step 9: Now lets set up at "CNAME (Alias)" part
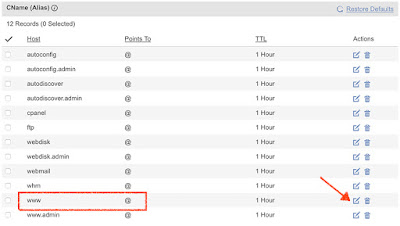
a. Find out the www and @ this line you need to click on edit icon as shown in the above picture. When you click edit icon the pop-up form will appear and need you to completed this form by fill up only 2 columns. The first column you keeping with www and the second column fill up with ghs.google.com where you can get it from the step #3.
b. Now add another record by click on "Add record" then the pop-up form will be appeared, then select "CNAME".

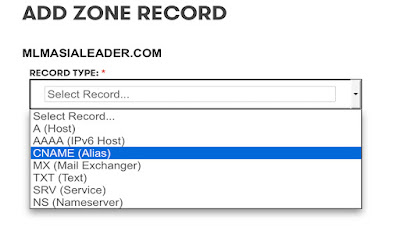
c. You need to fill up the token code that you have received on Step #3. First, column fills up with the 1st code and second column fill up with the 2nd code then click on "Finish Button". Do not forget to Save that will appear after you click Finish.

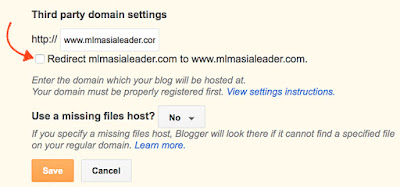
Step 10: Now back to your blogger setting then click "Save Button", a good result will be like this below picture.

Step 12: Please review from step 1 - step 11 to make sure that you did right, then you will enjoy your web URL. Just we know if you have any further inquiry.
Note. In Godaddy, there will be two difference control panel old one and new. In this tutorial is a new panel. If you are in the old control panel, it will be a bit difference.
