By using the sitemap page, visitors to our blog can easily navigate through the all of our published content under different categories they are interested in.
Ultimately our blog's page-views increase and bounce rate decrease. Good for SEO, no?
After using the sitemap page on my blog for a long time now, I can say it is one of the most visited pages on my blog. When visitors find out the content on your blog more useful, they hunt for more content like this on your blog and if a sitemap page is available on your blog, what else do they need more?
This tutorial has been requested multiple times and I could not come up with it on time due to some personal reasons. Today I share the exact code that I am using on my blog for a sitemap.
Google Drive has Stopped Hosting so I have updated JavaScript file to Dropbox hosting which provides HTTPS in my personal host at Blog Supporter Codes Please note that this hosting provider does not use HTTPS so these codes may not work on blogger subdomain names but will work fine with custom domain names.
Credits-
The code I am going to share is issued by +Taufik Nurrohman. He is from Indonesia and he has done so much for blogger platform users by releasing the amazing scripts for free. We owe to him.
Most of the template designers who are selling blogger templates on ThemeForest.com use his scripts to add amazing functionalities and awesome features to their templates.
Demo Screenshot of Sitemap Page We Are Going To Add

Live demo can be seen by visiting the sitemap page of this blog.
Please note that I did not add any new functionalities or modified this sitemap code but I just played with the CSS code to give it an elegant look and to match the color theme of my blog.
You can do the same and I'll explain it in detailed steps. Let's begin the process.
Recommended: How to Create a Landing Page on Blogger
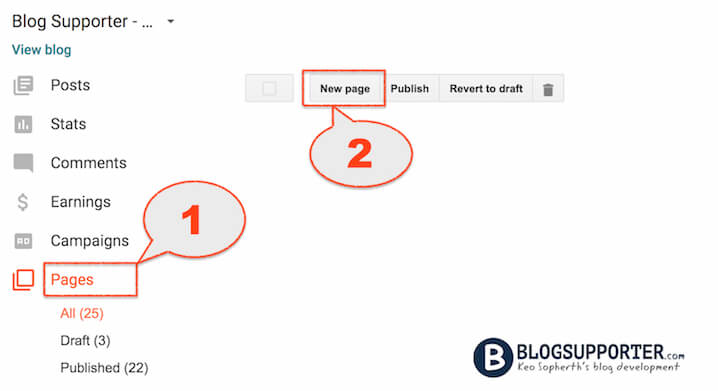
Step 1. Create A New Page On Your Blog
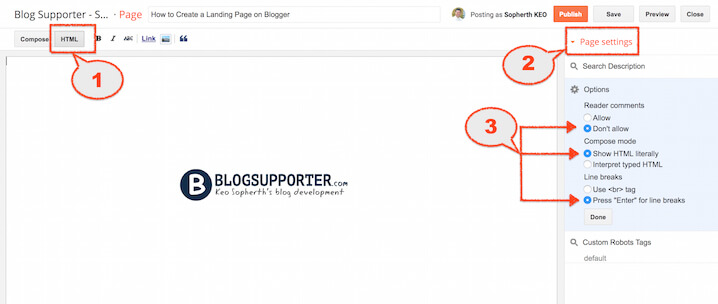
First of all just create a new page on your blog then change the page settings and switch to HTML mode. Enter the name of the page as "Sitemap" in the Title area to get the same permalink to your new page. See the screenshot below.Create a New Landing Page

Switch to HTML Mode and Setup Options


Switch to HTML Mode and Setup Options

Step 2. Copy And Paste The Whole JavaScript and CSS Code
When you'll switch to the HTML mode, you'll see the few lines of HTML code inside the post editor already added by default so just select those all and remove them. Now paste the whole code given below in the post editor. For further customization and to match the color scheme of your blog, read the Editing step given below the code.<div id="tabbed-toc">
<span class="loading">Loading, please wait for a moment...</span></div>
<br />
<script type="text/javascript">
var tabbedTOC = {
blogUrl: "https://www.blogsupporter.com", // Enter your blog URL
containerId: "tabbed-toc", // Container ID
activeTab: 1, // The default active tab index (default: the first tab)
showDates: false, // `true` to show the post date
showSummaries: false, // `true` to show the posts summaries
numChars: 200, // Number of summary chars
showThumbnails: false, // `true` to show the posts thumbnails (Not recommended)
thumbSize: 40, // Default thumbnail size
noThumb: "", // A "no thumbnail" URL
monthNames: [ // Array of month names
"January",
"February",
"March",
"April",
"May",
"June",
"July",
"August",
"September",
"October",
"November",
"December"
],
newTabLink: true, // Open link in new window. `false` to open in same window
maxResults: 99999, // Maximum post results
preload: 0, // Load the feed after 0 seconds (option => time in milliseconds || "onload")
sortAlphabetically: true, // `false` to sort posts by published date
showNew: 7, // `false` to hide the "New!" mark in most recent posts or
//define how many recent posts are to be marked by changing the number
newText: " - <em style='color: white;padding: 1px 5px;border-radius: 20px;background-color: #F00;'>New!</em>" // HTML/CSS for
//the "New!" text
};
</script>
<script src="http://codes.blogsupporter.com/demo-script/sitemap-defaults.js" type="text/javascript"></script>
<style>
/*Sitemap */
#tabbed-toc {
width: 99%;
margin: 0 auto;
overflow: hidden !important;
position: relative;
color: #222;
border: 0;
border-top: 5px solid #FC0204;
background-color: #1D1D1D;
-webkit-transition: all 0.4s ease-in-out;
}
#tabbed-toc .loading {
display:block;
padding:5px 15px;
font:normal bold 11px Arial,Sans-Serif;
color:#FFF;
}
#tabbed-toc ul,
#tabbed-toc ol,
#tabbed-toc li {
margin:0;
padding:0;
list-style:none;
}
#tabbed-toc .toc-tabs {
width: 24.8%;
float: left !important;
}
#tabbed-toc .toc-tabs li a {
display:block;
font:normal bold 10px/28px Arial,Sans-Serif;
height:28px;
overflow:hidden;
text-overflow:ellipsis;
color:#ccc;
text-transform:uppercase;
text-decoration:none;
padding:0 12px;
cursor:pointer;
-webkit-transition: all 0.3s ease-in-out;
}
#tabbed-toc .toc-tabs li a:hover {
background-color: #515050;
color: #FFF;
}
#tabbed-toc .toc-tabs li a.active-tab {
background-color: #FFFC03;
color: #222;
position: relative;
z-index: 5;
margin: 0 -2px 0 0;
}
#tabbed-toc .toc-content,
#tabbed-toc .divider-layer {
width: 75%;
float: right !important;
background-color: #F5F5F5;
border-left: 5px solid #FFFC03;
-webkit-box-sizing: border-box;
-moz-box-sizing: border-box;
box-sizing: border-box;
-webkit-transition: all 0.3s ease-in-out;
}
#tabbed-toc .divider-layer {
float:none;
display:block;
position:absolute;
top:0; right:0; bottom:0;
}
#tabbed-toc .panel {
position:relative;
z-index:5;
font:normal normal 10px Arial,Sans-Serif;
}
#tabbed-toc .panel li a {
display: block;
position: relative;
font-weight: bold;
font-size: 11px;
color: #222;
line-height: 2.8em;
height: 30px;
padding: 0 10px;
text-decoration: none;
outline: none;
overflow: hidden;
-webkit-transition: all 0.3s ease-in-out;
}
#tabbed-toc .panel li time {
display:block;
font-style:italic;
font-weight:400;
font-size:10px;
color:#666;
float:right;
}
#tabbed-toc .panel li .summary {
display:block;
padding:10px 12px;
font-style:italic;
border-bottom:4px solid #275827;
overflow:hidden;
}
#tabbed-toc .panel li .summary img.thumbnail {
float:left;
display:block;
margin:0 8px 0 0;
padding:4px;
width:72px;
height:72px;
border:1px solid #dcdcdc;
background-color:#fafafa;
}
#tabbed-toc .panel li:nth-child(even) {
background-color: #DBDBDB;
font-size: 10px;
}
#tabbed-toc .panel li a:hover,
#tabbed-toc .panel li a:focus,
#tabbed-toc .panel li a:hover time,
#tabbed-toc .panel li.bold a {
background-color:#222;
color:#FFF;
outline:none;
-webkit-transition: all 0.3s ease-in-out;
}
#tabbed-toc .panel li.bold a:hover,
#tabbed-toc .panel li.bold a:hover time {
background-color:#222;
}
@media (max-width:700px) {
#tabbed-toc {
background-color:#fff;
border:0 solid #888;
}
#tabbed-toc .toc-tabs,
#tabbed-toc .toc-content {
overflow:hidden;
width:auto;
float:none !important;
display:block;
}
#tabbed-toc .toc-tabs li {
display:inline;
float:left !important;
}
#tabbed-toc .toc-tabs li a,
#tabbed-toc .toc-tabs li a.active-tab {
background-color:#222;
color:#ccc;
}
#tabbed-toc .toc-tabs li a.active-tab {
color:#000;
}
#tabbed-toc .toc-content {
border:none;
}
#tabbed-toc .divider-layer,
#tabbed-toc .panel li time {
display:none;
}
}
</style>
Editing:
1) To change the message which appears before the sitemap is loaded, change this
Loading, please wait for a moment..." line to your own.2) Replace my blog URL with your blog URL by replacing
https://www.blogsupporter.com and those who are using the free blogspot domain name, change your country specific extension to .com at the end of the URL.For example, change
https://yourblog.blogspot.uk to https://yourblog.blogspot.com where .uk is a country specific TLDN for UK users, got it?3) The above codes support the HTTPS extension (https://). Therefore, If you are using HTML extension (http://), you need to change the script file at
https://dl.dropboxusercontent.com/s/b3gh8boe1buhhfq/sitemap-defaults.js to http://codes.blogsupporter.com/demo-script/sitemap-defaults.js instead. If you don't change it, the elegant HTML sitemap will not work.4) The color scheme is yellow and you may like to change it to your blog's color scheme. To change the yellow color just replace this
#FFFC03 color code to your own which appears two times in the CSS code above.Finally hit Publish button and visit your sitemap page to check if it is working or not. It should be 100% working for everyone.
Recommended: Responsive Contact Form For Blogger
Hide The Specific Labels And Show Selected Labels Only
What if you have a huge list of labels and you only want to show the selected labels on your sitemap page? This script automatically fetches all the labels and shows them all on the sitemap. We can't stop appearing unwanted labels or show the selected labels only with the script. It will generate and show all the labels of your blog in your sitemap.Many of you guys may don't like to show all of your labels if they are above 100+ so in that case, I have a simple solution to hide the unwanted labels from appearing and show only the selected ones.
This is possible with simple CSS code so please read the steps carefully and be ready to follow a boring task.
Step 1. Selecting The Labels To Hide
First of all just visit your newly published sitemap page and let the sitemap load. You will see all the labels listed and sorted alphabetically on the left side (if you did not change the settings from JavaScript).Now start counting your labels. Yes, you heard it right.
Because you need to note down the number of the label you want to hide. Usually counting starts from 1 but you have to count from ZERO. It means your very first label is on number ZERO in the list and the second label is on number one. Same goes on until the end.
Step 2. Add The Number of The Label To The Class Name
Finally, if you have noted down all the numbers of labels you want to hide then now add the numbers to this class name .toc-tab-item-ADD-NUMBER and add those all the classes together just like the example code given below:<style>
.toc-tab-item-0, .toc-tab-item-1, .toc-tab-item-5, .toc-tab-item-7 {display: none !important;}
</style>
In the above CSS code, I have selected the label number 1, 2, 4 and 6 to hide (Remember to count from ZERO=1). Use the above code as a reference and add all of the numbers of the labels like as I did in the example code above. Ask me on the comments if you did not get it.
After adding all those classes, go back to edit the sitemap page then just add this CSS code inside your sitemap page like as you have added the previous codes. Now update your page and see the results if they are as expected or not.
Finally, this is all I could do in this tut and I hope it is simple enough to understand for newbies too.
If you're facing any kind of problem or need any help regarding further customization of your sitemap page then just leave your message in the comments or shoot me an email. Your feedback is much appreciated.
I'll definitely get back to support you. Support me by sharing this post and socializing with me. Stay Blessed!
